

Like humans, up to 60% of a chicken's body is made up of water, so water intake is pretty important for your ladies to say the least!
A chicken will drink around a pint of water a day, but it can change depending on a few different factors:
-
Seasons - your ladies will drink twice as much in the hotter months
-
Age - as chickens age, they drink more
-
Laying - If they’re laying, they’ll drink about twice as much as non-layers
-
Time of day - they’ll drink the most as soon as they wake up
This guide should give you a good idea of which chicken waterers to use for your flock!
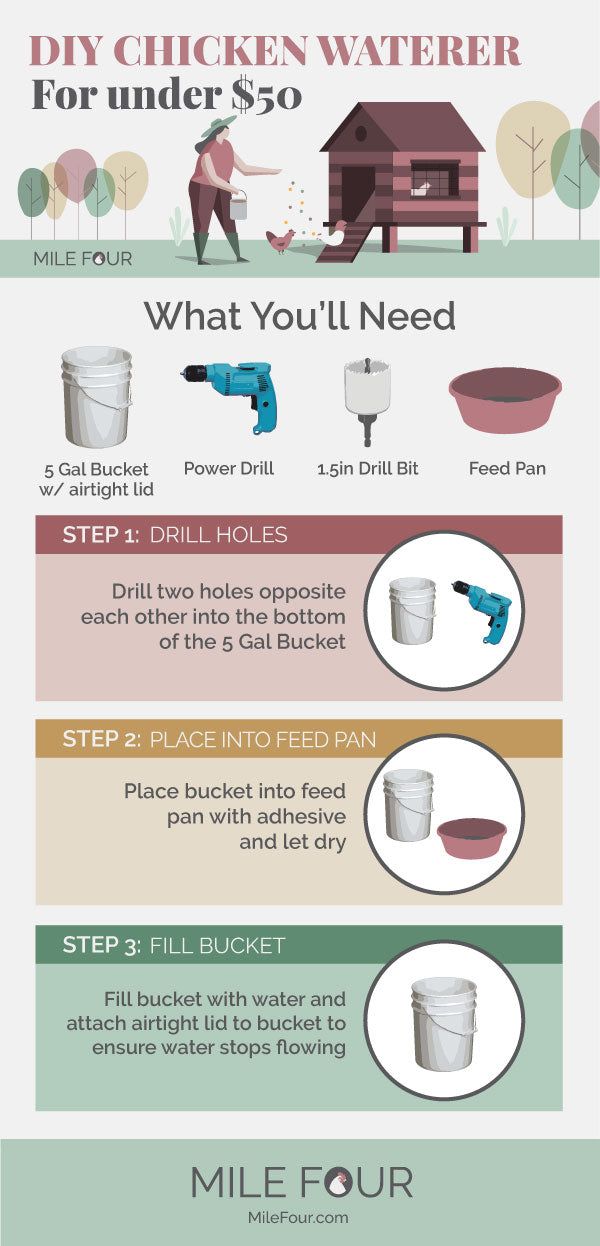
DIY Chicken Waterer
Having a backyard farm can be quite expensive from time to time. Costs add up for a variety of reasons, which is why DIY comes in so handy. You can quite easily make a chicken waterer at home yourself for under $50 with a few simple bits and pieces. It’s technically free if you already have them lying around!
All you’ll need is:
-
A drill with a 1-1.5 inch bit ($21.96)
-
A feed pan ($12.05) (or if you really want to go 100% DIY, a foil pan that you’d generally use in the kitchen).
-
At the bottom of the bucket, drill two 1-1.5 inch holes opposite from one another and place the bucket in the pan
-
Fill the bucket with water. You’ll notice at first that the water keeps flowing through the holes. The trick here is to create an airtight seal around the top of the bucket. Most of the buckets come with a lid, but if not, you can get one from your local hardware store that is specifically airtight.
If the seal isn’t airtight, your water will continue to flow out over the top of the pan.
An easy way to ensure no loss of water is to pop the lid on top and fill the bucket upside down with a hose. Then, simply flip it onto the pan and hey presto!
The issue with this method is the water may not stay clean for very long, and you want it to be as clean as it possibly can be at all times to prevent infection.
Ensuring you clean the bucket every single time you refill it as well as the tray is the best you can do to try and prevent infection.
If you’re worried about diseases spreading through water intake, you may want to look at some other options.
Below we’ve provided a handy graphic to aid you in making your own chicken waterer!
Share This Image On Your Site
Automatic Chicken Waterers
The best type of waterer in our opinion are automatic chicken waterers. Automatic chicken waterers are the best simply because there’s so little chance that the water can become contaminated.
The water is still kept in a jug or container, but the way it’s dispensed is different. Automatic waterers utilize “nipples” to dispense the water for your chickens.
These require much less maintenance than a DIY waterer, but you’ll still want to make sure you’re cleaning the bucket regularly to minimize the chance that water can be contaminated.
Chicken Water Nipples
Your chicken water nipple will screw into a bucket or jug for DIY waterers, but you can buy an automatic waterer that is already set up with water nipples.
The nipple is practically just a metal peck toy that will release a small amount of water when they peck at it.
The benefits of using a water nipple severely outweigh the negatives:
-
Ease - they’re very easy to set up
-
Cleanliness - they keep the water as clean as possible
-
Less chance of bacteria - bacteria grows in standing water, but the small amount of water dispensed means bacteria growing is highly unlikely
With younger hens, it’ll be quite easy to train them to use the system. They may even figure it out by themselves.
Your older hens will need a bit of coaxing, so it might be best to completely remove all other waterers from the area and try to have some of the younger hens demonstrate to the older ones how to do it.
Eventually, without any other water source available, they’ll peck at the nipple and figure it out, but it will take longer than usual. This is why you’ll want to install the new heater in the fall or early winter so they aren’t desperate to drink.
Chicken Water Cups
Chicken Water Cups work quite similarly to the water nipples, but generally dispense more water and hold it in a (you guessed it) cup.
The nipple on these cups is usually much bigger than the standard nipple waterers and will dispense more water until the cup is filled.
While still much cleaner and less susceptible to bacteria growth than a regular DIY waterer, there still is the opportunity for the water in the cup to get dirty, so make sure the cups are getting cleaned as often as the jug/bucket itself.
A good way to train your hens to use this method is to put some treats into the dry cup so they’ll peck at it and release the water. Of course, you’ll want to clean the cup thoroughly once they’ve got the hang of it.
Heated Chicken Waterer
Chances are you and your chickens are going to run into some cold weather at some point. The best thing for your ladies would be a heated chicken waterer.
Heated chicken waterers require access to electricity, so you’ll want to make sure your coop is either set up close to outdoor outlets or if you’re a master DIYer (or an electrician) you’ve built your coop with electricity included.
Heated chicken waterers come in pretty much the same variations as non-heated ones with the main difference being you can feel safe your chickens will still have access to water in sub-zero temperatures.
How to Clean a Chicken Waterer
The process of cleaning your chicken waterer remains the same for each product you use, but the frequency of which you’ll clean it changes.
If you’re using our DIY Chicken Waterer, you’ll want to clean that each time you refill, but if you’re using an automatic chicken waterer, you can probably change your cleaning schedule to weekly.
Use your discretion, however. If you think something is dirty, clean it. It’s a short amount of time spent to ensure your chickens stay healthy.
What you’ll need is:
-
A brush
-
Apple Cider Vinegar
-
Water
Dump the Apple Cider Vinegar into the waterer and let it sit. You’ll probably want to grab a cheap wholesale brand of Apple Cider Vinegar for this because a lot of waterers are quite deep. You don’t need to fill the full thing, but enough so that you can scrub it all around the waterer.
Once you’ve let the vinegar sit for a few minutes, start to scrub the waterer and make sure you’re getting rid of all of the dirt that may have gathered.
Once you’re satisfied, dump the vinegar out and refill with water. Scrub again if you want, or simply rub the sides with your clean hands and then dump that water out.
Now you’re ready to go! The water should be clean until the next time you refill, but make sure you’re not letting water sit in the waterer for too long before a refill.
If your chickens aren’t drinking enough water, you’ll want to invest in a smaller waterer so the water you’re giving them doesn’t get contaminated easily or sit in the sun for too long.
And that's that! If you have any tips or tricks for chicken waterers, comment below or email us at milefour@milefour.com.
Additional Resources:
A List of DIY plans from Poultry Care Sunday
A great DIY plan from Bless This Mess.
A collection of DIY plans from Homesteading.com